第一章Drupal7主题制作
作者:老葛,北京亚艾元软件有限责任公司,http://www.yaiyuan.com
今天是2013年4月3日,我们的think in Drupal第5集正式开工了,从第4集到现在已经过去了3个月的时间了,中间事情很多,让我们耽误了一段时间,不过还好,我们还会继续下去的。
我们在第5集里面,主要讲解Drupal的主题制作,以及多语言网站建设。如果篇幅允许的话,可能再加点别的。开始我是这样计划的,做一个公司的网站,从设计,到转成HTML,再转成Drupal主题,然后再做出来网站,最后再做出来中英文版的。我们这里的多语言,就是指的中英文网站。
不过我找的美工比较忙,一直没有帮我制作HTML,不过我们的教程不会因此而停止的,还有,我朋友公司的静态HTML愿意提供给我作为素材,在此,我们对lonlife.net提供的素材表示感谢。制作Drupal主题的原理是一样的,我的意思是说,每个主题的外观都是不一样的,但是从静态HTML到Drupal主题的转换过程,大致是一样的。
我们这一集讲两个例子,一个就是从静态HTML,转为Drupal主题;另一个就是基于Omega,制作自己的子主题。从而也让大家看到两种制作Drupal主题的方式。
Drupal版本:
1 静态HTML分析
作者:老葛,北京亚艾元软件有限责任公司,http://www.yaiyuan.com
我们先来看一下,第一个例子,从静态HTML,转为Drupal主题。首先来看做好的静态HTML,这是朋友网站的静态HTML。
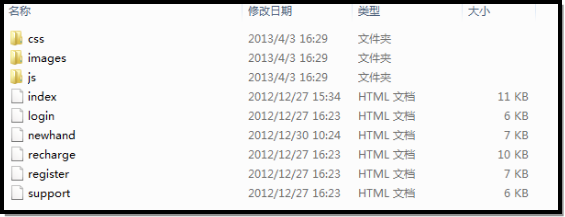
我们看到,这里面包含6个静态HTML页面。Drupal主题制作的正常流程是这样的:
需要经过设计、切图、转Drupal主题。现在前面两步已经完成了,我们接下来要做的是把静态HTML转为Drupal主题。

Drupal版本:
10 控制区块的HTML输出
作者:老葛,北京亚艾元软件有限责任公司,http://www.yaiyuan.com
现在回到首页,发现有了内容,不过这里的区块标题不是我们想要的:
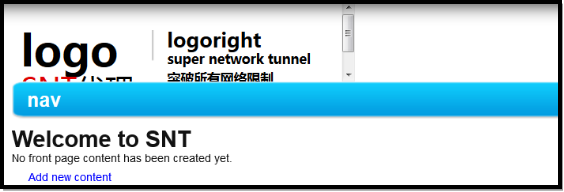
我们在输入区块标题,区块描述的时候,两个地方都输入了。区块标题默认会显示出来的。有人可能会问,区块描述为什么是必填的?而区块标题则允许为空?
区块标题,是在页面上面显示出来的区块的标题,区块描述是在后台显示给管理员看的,一个是给普通用户看的,一个是给管理员看的。

在区块的配置页面,我们将区块标题置为空,就可以解决这个问题了。还有一个办法,就是在区块的模板文件里面,不输出区块标题变量。
Drupal版本:
10.10 hook_theme和theme_hook之间的区别
作者:老葛,北京亚艾元软件有限责任公司,http://www.yaiyuan.com
我们这里顺带讲解一下hook_theme和theme_hook之间的区别。在Drupal7下,所有的主题函数,又被称为主题钩子函数,比如
theme_breadcrumb
theme_links
theme_menu_tree
这些函数,属于theme_hook的范畴,theme_后面跟的是具体的钩子。
hook_theme,我们举个例子,比如node_theme(),block_theme,这是它在节点、区块里面的具体实现,它是一个普通的钩子函数,和我们平时所用的hook_form_alter是一个概念,这个钩子函数是用来注册主题函数和模板文件的。在Drupal中使用的主题函数和模板文件都需要在这里注册一下,不然的话Drupal无法识别这些主题函数或者模板文件。
Drupal版本:
10.11 主题函数建议
作者:老葛,北京亚艾元软件有限责任公司,http://www.yaiyuan.com
我们向template.php文件中添加以下代码:
function snt_menu_tree__main_menu($variables) {
return '<ul>' . $variables['tree'] . '</ul>';
}
注意我们这里的函数名字,我们是可以使用snt_menu_tree,不过这将作用于所有的菜单,我们只想作用于主菜单,所以在后面加了__main_menu,这是主题函数建议,和模板建议是一个概念。
对于模板建议,我们知道,模板建议规则,是在模板文件的预处理函数中,通过'theme_hook_suggestions'定义的。很多人可能会问,主题函数的建议,是在什么地方定义的?在Drupal6的时候,主题函数是没有建议这么一说的,只有模板建议,在Drupal7下面改进了一下,增加了主题函数的建议,不是每个主题函数都支持建议的,需要具体情况具体分析,这取决于不断地实践。对于theme_menu_tree,我们在menu_tree_output函数里面,代码的最后部分:
// Add the theme wrapper for outer markup.
// Allow menu-specific theme overrides.
$build['#theme_wrappers'][] = 'menu_tree__' . strtr($data['link']['menu_name'], '-', '_');
theme_menu_tree的建议规则,就是在这里定义的,所以我们可以使用snt_menu_tree__main_menu这个函数,它只作用于主菜单。
现在清除缓存,访问首页,通过Firebug查看源代码:
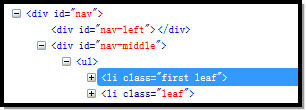
ul标签上面的class属性已经被我们删除了,不过主导航的样式,还没有调整过来。我们现在覆写theme_menu_link,将这个函数从menu.inc中,复制到template.php中,我们来看一下默认的样子:
function theme_menu_link(array $variables) {
$element = $variables['element'];
$sub_menu = '';
if ($element['#below']) {
$sub_menu = drupal_render($element['#below']);
}
$output = l($element['#title'], $element['#href'], $element['#localized_options']);
return '<li' . drupal_attributes($element['#attributes']) . '>' . $output . $sub_menu . "</li>\n";
}
我们对它做相应的调整,这是调整后的代码:
function snt_menu_link__main_menu(array $variables) {
$element = $variables['element'];
$sub_menu = '';
if ($element['#below']) {
$sub_menu = drupal_render($element['#below']);
}
$output = l('<span>'.$element['#title'].'</span>', $element['#href'], array('html' => TRUE,));
return '<li>' . $output . $sub_menu . "</li>\n";
}
这里面有两处修改,首先是将函数名字改为了snt_menu_link__main_menu,这里面的__main_menu,和前面我们用的,一样,都是主题函数建议;其次,就是将li里面的属性输出,给删除了。
可能还会有人问,我是怎么知道这个主题函数的建议规则的?在menu_tree_output函数里面,中间部分,有这样两行代码:
// Allow menu-specific theme overrides.
$element['#theme'] = 'menu_link__' . strtr($data['link']['menu_name'], '-', '_');
这里定义了theme_menu_link的建议规则。
现在清除缓存,查看源代码,和目标输出已经完全一致了:
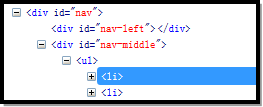
当然,此时的样式,也正常了:

对于下面的友情链接,我们也可以将它改造为菜单的形式,覆写的办法和这里一样,我们这里采用静态区块的形式就可以了。
Drupal版本:
10.1通过代码去除区块标题
我们将modules\block下面的block.tpl.php复制到sites\all\themes\snt\templates目录下面,同时我们将代码里面区块标题的输出给注释掉,这是调整后的代码:
<div id="<?php print $block_html_id; ?>" class="<?php print $classes; ?>"<?php print $attributes; ?>>
<?php print render($title_prefix); ?>
<?php if ($block->subject): ?>
<h2<?php print $title_attributes; ?>><?php //print $block->subject ?></h2>
<?php endif;?>
<?php print render($title_suffix); ?>
<div class="content"<?php print $content_attributes; ?>>
<?php print $content ?>
</div>
</div>
清除缓存数据,现在所有的区块标题,都不见了。
Drupal版本:
10.2 图片URL解决方案
我们现在继续,我们看到图片的显示不正常,如图所示:

这是因为图片的路径不对,这是我们使用的html片段:
<img src="images/br.gif" width="253" height="8" />
<img src="images/snt.gif" width="217" height="26" />
<img src="images/xiazai.gif" width="222" height="76" />
我们现在需要将它们调整为这样的形式:
<img src="http://localhost/snt2/sites/all/themes/snt/images/br.gif" width="253" height="8" />
<img src="http://localhost/snt2/sites/all/themes/snt/images/snt.gif" width="217" height="26" />
<img src="http://localhost/snt2/sites/all/themes/snt/images/xiazai.gif" width="222" height="76" />
这是可以工作的,但是,如果我们这样将路径写死在里面的话,将来如果我们更换了域名,此时需要重新的调整这些地址,如果要调整的地方很多,也是非常费力的。
我们可以采用这样的方案,启用核心自带的PHP过滤器模块,在banner-right区块里面,将对应的代码修改为:
<img src="<?php print base_path() . path_to_theme(); ?>/images/br.gif" width="253" height="8" />
<img src="<?php print base_path() . path_to_theme(); ?>/images/snt.gif" width="217" height="26" />
<img src="<?php print base_path() . path_to_theme(); ?>/images/xiazai.gif" width="222" height="76" />
然后将区块正文的文本格式设置为PHP Code,保存。图片的显示就正常了:

注意这里面,这段代码的使用,<?php print base_path() . path_to_theme(); ?>,这是在主题制作、Drupal开发中经常使用的代码。
对于页脚的snt-left区块,我们也做类似的调整:
<img src="<?php print base_path() . path_to_theme(); ?>/images/snt2.gif" width="66" height="25" />
Drupal版本:
10.3 控制菜单区块的输出
作者:老葛,北京亚艾元软件有限责任公司,http://www.yaiyuan.com
现在的主导航区块,还是静态的,如图所示:

我们想使用Drupal的主菜单来管理这里的内容,这样更方便一点。
Drupal版本:
10.4 创建主菜单
作者:老葛,北京亚艾元软件有限责任公司,http://www.yaiyuan.com
我们导航到admin/structure/menu,在这里找到主菜单,进入它的菜单链接列表页面admin/structure/menu/manage/main-menu。

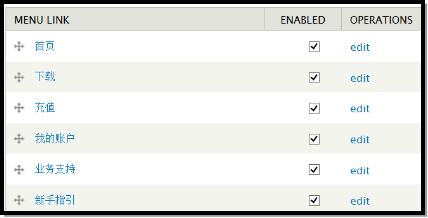
我们对默认的Home菜单链接进行编辑,将“Home”修改为“首页”,保存。然后依次添加菜单链接:下载、充值、我的账户、业务支持、新手指引。我们知道,在创建菜单链接的时候,必须提供一个有效的路径,所以我们为这些菜单链接默认使用路径“node/1”,这里面只有一个例外,就是“我的账户”,我们为它使用了路径“user”。开始的时候,我们可以随便的指定一个路径,在项目的后期,当我们有了真实可用的路径以后,我们再将它修改过来。通过拖拽,我们调整一下菜单链接之间的相对位置,这是调整后的样子。
Drupal版本:
10.5 放置主菜单区块
作者:老葛,北京亚艾元软件有限责任公司,http://www.yaiyuan.com
现在导航到区块管理界面admin/structure/block,找到主菜单区块,我们将它放到Navigation区域,然后将原来的nav区块的区域设置为None,这样我们就使用了主菜单做我们的导航了。调整完了以后,记得点击下面的保存区块按钮。

我们现在访问首页,来观察一下这个导航样式的变化,这是我在Firefox下面看到的效果:

我们看到样式变了,我们可以通过调整CSS,调整成原来的样子,我们也可以覆写HTML输出,让Drupal的HTML输出和美工切图后的HTML保持一致,这里我们采用后者。

这是当前的HTML,我们看到,与美工所给的HTML相比,Drupal输出了太多我们不想要的HTML markup。我们现在逐个的去掉这些多余的输出。
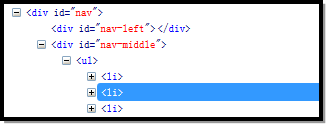
我们在firefox下面打开美工所给的静态页面,通过Firebug查看对应部分的源代码:
Drupal版本:
10.6 覆写region.tpl.php
作者:老葛,北京亚艾元软件有限责任公司,http://www.yaiyuan.com
我们的目标就是覆写Drupal的输出,使其与美工所给的输出保持一致。我们首先来看最外面的<div class="region region-nav">,这个div是在region.tpl.php里面输出的。我们首先找到默认的region.tpl.php文件,它位于modules\system目录下面,我们将它复制到sites\all\themes\snt\templates目录下面。我们来看一下这个模板文件:
<?php if ($content): ?>
<div class="<?php print $classes; ?>">
<?php print $content; ?>
</div>
<?php endif; ?>
我们这里只需要修改这个模板文件里面的内容,将div标签给删除即可,如果这样做的话,所有区域的div标签都会被删除,我们这里不这样做,首先完整的保留这个模板文件,然后我们新建一个模板建议文件,专门用于这里的导航区域。
我们在sites\all\themes\snt\templates下面新建一个文件夹override,里面用来放置模板建议文件,然后在这个文件夹下面,再创建一个子文件夹region,用来放置region.tpl.php的模板建议。
首先,这里除了templates的文件夹名字是固定的以外,里面子文件夹的名字,可以随便起,Drupal会自动的遍历templates里面的所有文件、文件夹、子文件夹。当然,我们需要起一个含义明确的名字,如果我们把所有的模板文件、模板建议文件,都直接放到sites\all\themes\snt\templates下面,这也是可以的;不过我们在实际的项目中,需要覆写的模板文件比较多,为了管理的方便,我们将模板建议文件统一放在了override下面;在override下面,又新建若干个文件夹,分别放置对应模板文件的覆写。
我们通过Google搜索一下预处理函数template_preprocess_region,我们可以在region.tpl.php模板文件中的注释里面找到这个函数名字。通常在搜索结果的第一条,就指向了api.drupal.org上面的对应代码了,我们点击对应的链接。

来看一下这个函数:
function template_preprocess_region(&$variables) {
// Create the $content variable that templates expect.
$variables['content'] = $variables['elements']['#children'];
$variables['region'] = $variables['elements']['#region'];
$variables['classes_array'][] = drupal_region_class($variables['region']);
$variables['theme_hook_suggestions'][] = 'region__' . $variables['region'];
}
注意代码里面的最后一行,表示它支持region--[region_name].tpl.php形式的模板建议。代码里面使用的是下划线,文件名字里面使用的是连字符。我们这里区域的名字,就是nav,这是在主题的snt.info文件中定义的。所以我们只需要创建region--nav.tpl.php就可以了。对于熟悉Drupal6主题开发的读者,这里需要注意,这里面是两个连字符--,不是一个,这是Drupal7与Drupal6之间的一个区别。
我们将region.tpl.php复制到sites\all\themes\snt\templates\override\region,然后将它重命名为region--nav.tpl.php,最后打开region--nav.tpl.php,删除里面的div代码,这是删除后的样子:
<?php if ($content): ?>
<?php print $content; ?>
<?php endif; ?>
其实这里面的if语句,在我们这里也没有什么特别的用出了,因此把if语句,也删除掉,这是删除后的代码:
<?php print $content; ?>
现在清除缓存,在浏览器中打开新标签页,访问http://localhost/snt2/,使用firebug查看页面源代码。我们看到,我们去掉region相关的<div>了。

但是此时,样式还没有任何变化。我们继续前进,我们把区块里面的多余HTML标签给删除掉。
Drupal版本:
10.7 覆写block.tpl.php
作者:老葛,北京亚艾元软件有限责任公司,http://www.yaiyuan.com
我们在sites\all\themes\snt\templates\override下面创建一个文件夹block,将sites\all\themes\snt\templates里面的block.tpl.php复制过来。我们打开block.tpl.php,在注释里面找到函数template_preprocess_block,通过Google搜索这个函数,点击打开api.drupal.org上面的链接,找到该函数的代码,我们看这一部分:
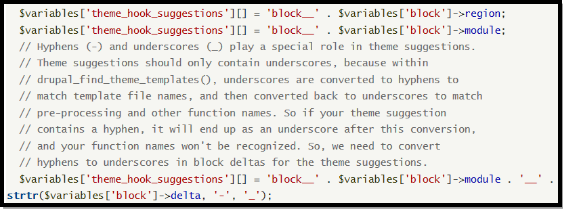
这里的英文注视,说的就是下划线、连字符两者的用法,我们在模块的代码里面,也就是这里的预处理函书中,使用下划线,在文件名字里面使用连字符。如果在代码的'theme_hook_suggestions'数组里面使用了连字符,它就不会正常工作。我们看到,block.tpl.php支持以下形式的模板建议:
block--[region].tpl.php
block--[module].tpl.php
block--[module]--[delta].tpl.php
注意,这里需要解释一下的是这里的delta,delta是区块在当前模块里面的唯一标识,它在当前模块里面是唯一的,但是不是在所有区块里面都是唯一的。所以模块名,加上delta,合在一起,就是区块的唯一ID。
在我们这里,使用的区域为nav,模块名为system,delta为main-menu。我们导航到区块的管理界面,点击配置链接,进入区块的配置页面。此时的配置链接里面,就包含模块名和Delta信息:admin/structure/block/manage/system/main-menu/configure。
因此我们可以使用:
block--nav.tpl.php
block--system--main-menu.tpl.php
我们这里采用后者,将sites\all\themes\snt\templates\override\block下面的block.tpl.php重命名为block--system--main-menu.tpl.php,然后修改模板文件里面的代码,这是修改后的:
<?php print $content ?>
是的,就是这样,除了区块内容以外,我们没有输出任何的东西。这是我在实际的项目中,经常采用的方法。但是这种方式也有一种局限性,就是说,区块的配置链接没有了,所以当你使用的时候,需要注意一下,到底要不要输出区块的配置链接。区块的配置链接,是通过变量$title_suffix输出的。
我们现在清除缓存,使用Firebug查看源代码,现在干净了很多:
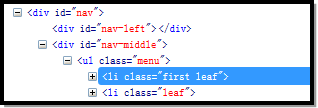
不过样式还没有没有变化:

与美工所给的输出相比的,我们的ul、li上面多了class属性,我们来看ul,Drupal默认的输出为<ul class="menu">,为了和美工所给的HTML保持一致,我们需要将它覆写为<ul>。在哪个模板文件里面覆写这里的输出呢?实际上这里的HTML是由Drupal的菜单系统控制,而且是由主题函数控制的。
Drupal版本:
10.8 覆写主题函数
作者:老葛,北京亚艾元软件有限责任公司,http://www.yaiyuan.com
打开Drupal核心的includes文件夹,在里面找到menu.inc文件,打开这个文件,在这里面可以找到函数theme_menu_tree和theme_menu_link,这两个主题函数用来控制菜单和菜单链接的HTML输出。我们需要对这两个函数进行覆写。
首先来看theme_menu_tree,代码如下:
function theme_menu_tree($variables) {
return '<ul class="menu">' . $variables['tree'] . '</ul>';
}
这里的class="menu",就是我们想要去除的。
Drupal版本:
10.9 template.php文件的作用
作者:老葛,北京亚艾元软件有限责任公司,http://www.yaiyuan.com
我们回到sites\all\themes\snt文件夹下,在这里面创建文件template.php,这里的template.php,就相当于模块的.module文件,它对于Drupal的主题是非常重要的。我们在template.php文件中,可以做很多事情,比如:
1) 自定义函数,可以放到这里,然后在模板文件中调用,这样模板文件中,就不用放置太多的PHP逻辑代码。
2) 实现预处理、处理函数,为模板文件添加变量或者修改变量。
3) 实现钩子函数,比如hook_form_alter,hook_theme,在这一点上完全等同于.module文件,这是Drupal7对Drupal6的一个改进。
4) 实现主题函数,在当前主题下覆写默认的输出。
我们这里,当前用到的是第4条,实现主题函数的覆写。对于创建template.php文件,我仍然是喜欢复制一个已有的文件,然后修改。我这里是从网上书店里面复制过来的,里面包含了很多注释掉的代码。
Drupal版本:
11 区块的可见性设置
作者:老葛,北京亚艾元软件有限责任公司,http://www.yaiyuan.com
我们现在来看右上角的区块top right,在登录状态下,显示的内容仍然是:

我们配置这个静态区块,首先让这里的注册、登陆两个链接可以工作,我们修改区块里面的相应内容,这是修改后的样子:
<a href="<?php print base_path(); ?>user/register">注册</a></span> <span class="zd"><a href="<?php print base_path(); ?>user/login">登陆</a>
我们这里只使用了<?php print base_path(); ?>,后面紧跟着内部路径,两者之间没有使用“/”。
然后,我们把文本格式修改为PHP code。
在区块的可见性设置里面,点击“Roles”(角色)标签,选中匿名用户。
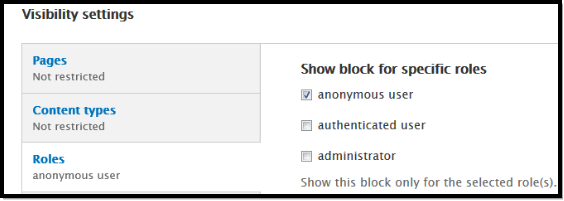
然后将区块描述修改为:
保存区块。
我们新建一个区块,将区块描述设置为“top-right authenticated user”,区块的正文设置为:
<p><span class="weibo"><a href="#">官方微博</a></span> | <span class="weibo"><a href="#">帮助中心</a></span> <span class="zd"> 欢迎 <?php global $user; print l($user->name, 'user') ?></span></p>
<p class="kefu">客服电话:400-680-6666</p>
这里,除了注册、登陆所在的地方被替换掉了以外,其它地方和匿名用户的区块保持一致。我们这里只看变动的地方:
<span class="zd"> 欢迎 <?php global $user; print l($user->name, 'user') ?></span>
对于路径,我们使用'user'即可,不需要使用'user/' . $user->uid,两者的效果是一样的。
文本格式我们继续使用PHP code。
对于区域设置,我们将它指定到同一个区域“top right”。
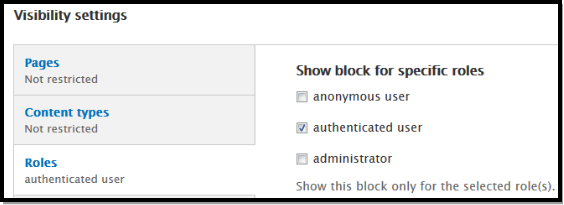
对于可见性设置,我们只让它显示给登录用户:

这是登录用户看到的区块:
和匿名用户看到的,已经有了变化。我们这里充分利用Drupal核心区块已有的可见性设置,很方便的解决了匿名用户、登录用户看到不同内容,这个常见问题。我们也可以创建一个区块,在一个区块里面,使用PHP代码搞定这样的问题,如果这样的话,也是可行的,不过PHP代码稍微复杂一点。借助于Drupal核心功能,轻松解决这个问题,何乐而不为呢?
Drupal版本:
2 静态页面效果预览
作者:老葛,北京亚艾元软件有限责任公司,http://www.yaiyuan.com
我们拿到HTML以后,首先需要看一下,静态页面的样子,这里有6个页面,我们来看一下。首先是首页index.html页面。
Drupal版本:
2.1 index.html页面
作者:老葛,北京亚艾元软件有限责任公司,http://www.yaiyuan.com


这就是首页,我这里截了上下两个图,QQ的抓图,只能抓当前屏幕的,而页面比较长,所以只能分成两部分截图。
我们看到首页其实是比较复杂的,我们大致可以将其分为三部分,上中下三部分。导航条上面的是一部分,友情链接下面的是一部分,中间是一部分。虽然布局稍微复杂一点,不过还是很有中国特色的,很多中国的网站都是这样的风格。
Drupal版本:
2.2 newhand.html页面
作者:老葛,北京亚艾元软件有限责任公司,http://www.yaiyuan.com
接下来,我们使用浏览器打开下一个页面,newhand.html。我们来看一下这个页面的样子:

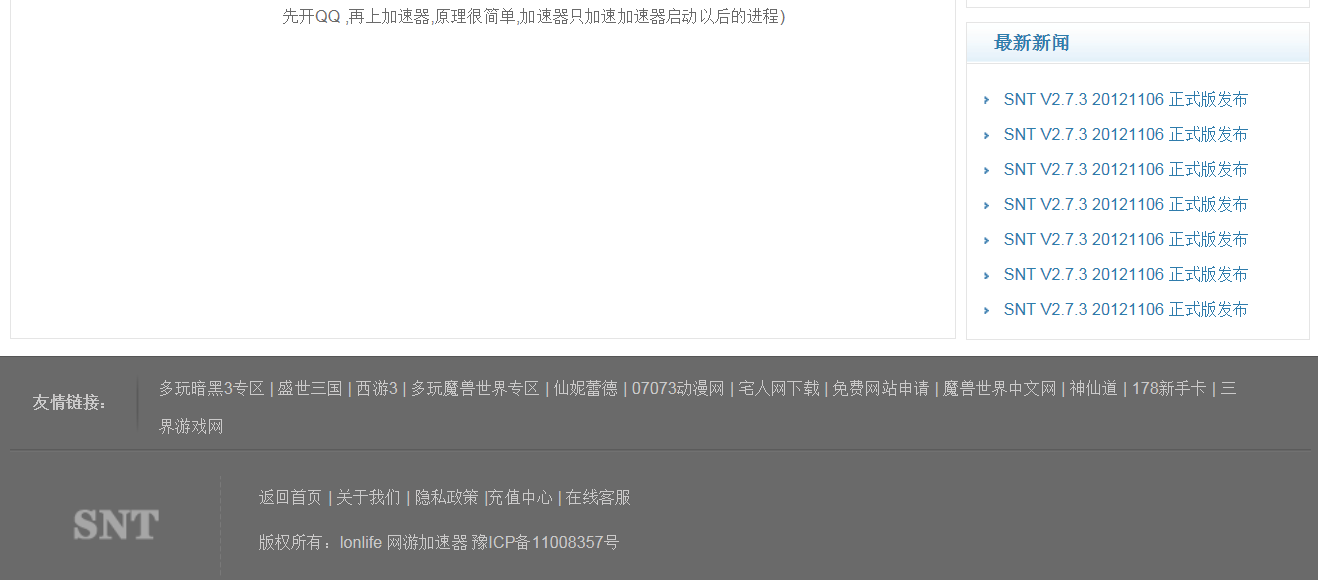
在这里我们看到,这个页面和首页相比,头部和尾部都是相同的,对于中间的部分,右边栏也是相同的。我在看这些界面的时候,在查看的过程中,大致的确定一下Drupal里面的区域。我假定你对Drupal的主题的基础知识已经有了解。
对于头部,我们大致确定三个区域,分别为:

和

还有:

而对于页脚,我们大致可以确定出来两个区域,分别为:
![]()
和

注意,我们这里只是大致的确定。就是从界面上面确定,我们后面还需要进一步的根据HTML代码,更准确的确定区域。
Drupal版本:
2.3 recharge.html页面
作者:老葛,北京亚艾元软件有限责任公司,http://www.yaiyuan.com
我们现在来看recharge.html:

再往下的内容,和前一个页面一致。只有中间的内容有变化,而中间部分又可以分为左右两部分,右边是一个边栏,里面的内容不变,只有左边的内容变。所以我们可以把右边部分确定成为一个Drupal区域,左边部分采用内容区域,这是一种方案。还有一种方案,把中间的这一大部分,处理成内容区域,左右两部分处理成Panels的布局。大家都知道,作者是比较喜欢Panels 这种方式,不过在这里面,我们首先讲解第一种方式。
第一种方式,就是完全基于Drupal核心的主题机制,这种方式的学习成本低,易于学习;Panels的方式,有好的一方面,但是也有坏的一方面,坏的一方面,就是你需要学习Panels模块,学习成本上来了,就是比第一种方式学习成本高。我建议刚开始接触Drupal,使用Drupal做网站的朋友,先采用简单的方式。先学会怎么用了以后,在发现了Drupal核心主题机制的种种限制以后,再去尝试Panels。这样可以降低项目的风险。
Drupal版本:
2.4 register.html页面
作者:老葛,北京亚艾元软件有限责任公司,http://www.yaiyuan.com
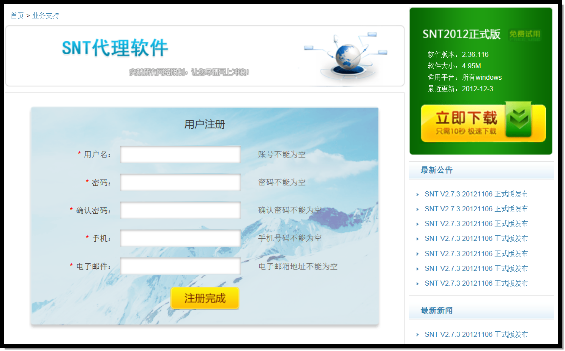
现在我们打开register.html,头部和尾部和前面的一样,只有中间部分不同:
Drupal版本:
2.5 support.html页面
作者:老葛,北京亚艾元软件有限责任公司,http://www.yaiyuan.com
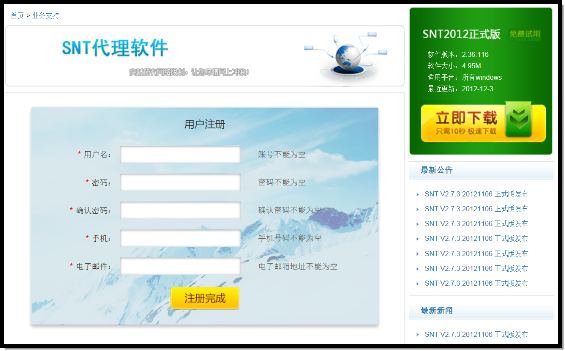
打开support.html,头部和尾部还是一样,只有中间部分不同:
Drupal版本:
2.6 login.html页面
作者:老葛,北京亚艾元软件有限责任公司,http://www.yaiyuan.com
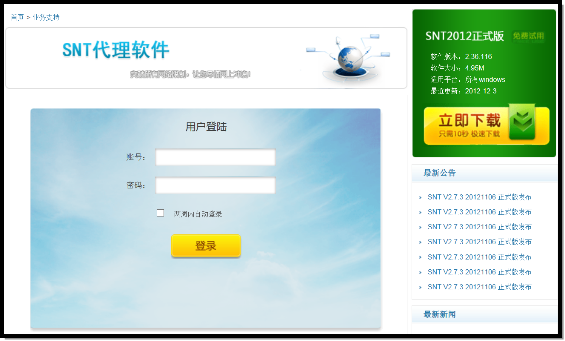
还有login.html页面,中间部分:
到现在为止,我们对于美工所给的HTML已经有了一个初步的印象。接下来,我们需要去阅读所给的这些HTML代码。是的,我们需要每个HTML页面都读一遍,分析里面结构。从里面找出相同的部分。
Drupal版本:
3 静态页面源码分析
Drupal版本:
3.1 index.html的代码
作者:老葛,北京亚艾元软件有限责任公司,http://www.yaiyuan.com
这是index.html的代码:
<!DOCTYPE html PUBLIC "-//W3C//DTD XHTML 1.0 Transitional//EN" "http://www.w3.org/TR/xhtml1/DTD/xhtml1-transitional.dtd">
<html xmlns="http://www.w3.org/1999/xhtml">
<head>
<meta http-equiv="Content-Type" content="text/html; charset=utf-8" />
<title>SNT</title>
<link href="css/css.css" rel="stylesheet" type="text/css" />
<script src="js/jquery-1.4a2.min.js" type="text/javascript"></script>
<script src="js/jquery.KinSlideshow-1.2.1.min.js" type="text/javascript"></script>
<script type="text/javascript">
$(function(){
$("#KinSlideshow").KinSlideshow({
moveStyle:"down",
intervalTime:8,
mouseEvent:"mouseover",
titleBar_height:40,
titleFont:{TitleFont_size:14,TitleFont_color:"#fdac11"}
});
})
</script>
<script type="text/javascript">
<!--
function MM_swapImgRestore() { //v3.0
var i,x,a=document.MM_sr; for(i=0;a&&i<a.length&&(x=a[i])&&x.oSrc;i++) x.src=x.oSrc;
}
function MM_preloadImages() { //v3.0
var d=document; if(d.images){ if(!d.MM_p) d.MM_p=new Array();
var i,j=d.MM_p.length,a=MM_preloadImages.arguments; for(i=0; i<a.length; i++)
if (a[i].indexOf("#")!=0){ d.MM_p[j]=new Image; d.MM_p[j++].src=a[i];}}
}
function MM_findObj(n, d) { //v4.01
var p,i,x; if(!d) d=document; if((p=n.indexOf("?"))>0&&parent.frames.length) {
d=parent.frames[n.substring(p+1)].document; n=n.substring(0,p);}
if(!(x=d[n])&&d.all) x=d.all[n]; for (i=0;!x&&i<d.forms.length;i++) x=d.forms[i][n];
for(i=0;!x&&d.layers&&i<d.layers.length;i++) x=MM_findObj(n,d.layers[i].document);
if(!x && d.getElementById) x=d.getElementById(n); return x;
}
function MM_swapImage() { //v3.0
var i,j=0,x,a=MM_swapImage.arguments; document.MM_sr=new Array; for(i=0;i<(a.length-2);i+=3)
if ((x=MM_findObj(a[i]))!=null){document.MM_sr[j++]=x; if(!x.oSrc) x.oSrc=x.src; x.src=a[i+2];}
}
//-->
</script>
</head>
<body onload="MM_preloadImages('images/anniu.gif')">
<div id="main">
<div id="top">
<div id="top-left">
<div class="logo"><span>SNT</span>代理</div>
<div class="logoright">
<p>super network tunnel</p>
<p>突破所有网络限制</p>
</div>
</div>
<div id="top-right">
<p><span class="weibo"><a href="#">官方微博</a></span> | <span class="weibo"><a href="#">帮助中心</a></span> <span class="zd"><a href="#">注册</a></span> <span class="zd"><a href="#">登陆</a></span></p>
<p class="kefu">客服电话:400-680-6666</p>
</div>
</div>
<div id="nav">
<div id="nav-left"></div>
<div id="nav-middle">
<ul>
<li><a href="#">首页</a></li>
<li><a href="#">下载</a></li>
<li><a href="#">充值</a></li>
<li><a href="#">我的账户</a></li>
<li><a href="#">业务支持</a></li>
<li><a href="#">新手指引</a></li>
</ul>
</div>
<div id="nav-right"></div>
</div>
<div id="banner">
<div id="banner-left">
<div id="KinSlideshow" style="visibility:hidden;">
<a href="1" target="_blank"><img src="images/banner1.gif" width="701" height="260" /></a>
<a href="2" target="_blank"><img src="images/banner2.gif" width="701" height="260" /></a>
<a href="3" target="_blank"><img src="images/banner3.gif" width="701" height="260" /></a>
</div>
</div>
<div id="banner-right">
<p><img src="images/br.gif" width="253" height="8" /></p>
<div class="br-middle">
<p class="xiazai"><img src="images/snt.gif" width="217" height="26" /></p>
<p class="banben">软件版本:2.36.116</p>
<p class="banben">软件大小:4.95M</p>
<p class="banben">适用平台:所有windows</p>
<p class="banben2">最近更新:2012-12-3</p><p><a href="#"><img src="images/xiazai.gif" width="222" height="76" /></a></p>
</div>
<div class="br-bottom"></div>
</div>
</div>
<div id="jishu">
<div id="jishu-left">
<div class="tupo">
<div class="tp-left">
<h2 class="blue">突破所有网络限制</h2>
<p><img src="images/01.gif" width="201" height="80" /></p>
<p>只要能开网页就能上QQ,玩游戏</p>
<p> 穿透各种防火墙 </p>
<p>突破一切网络限制</p>
<p> 让您尽情网上冲浪</p>
<p class="more"><a href="1" onmouseout="MM_swapImgRestore()" onmouseover="MM_swapImage('Image9','','images/anniu.gif',1)"><img src="images/anniu2.gif" name="Image9" width="133" height="28" border="0" id="Image9" /></a></p>
</div>
<div class="tp-left">
<h2 class="green">数据加密确保安全</h2>
<p><img src="images/02.gif" width="201" height="80" /></p>
<p>可选使用AES+RAS数据加密</p>
<p>确保所有通信数据安全</p>
<p>但速度会较慢</p>
<p>----------</p>
<p class="more"><a href="2" onmouseout="MM_swapImgRestore()" onmouseover="MM_swapImage('Image10','','images/anniu.gif',1)"><img src="images/anniu2.gif" name="Image10" width="133" height="28" border="0" id="Image10" /></a></p>
</div>
<div class="tp-left">
<h2 class="org"> 一键登陆使用方便</h2>
<p><img src="images/03.gif" width="201" height="80" /></p>
<p>使用方法:安装完成后</p>
<p> 输入用户名密码后即可登陆</p>
<p>登陆成功后,直接启动QQ或其它网游</p>
<p> 即可突破网络限制 </p>
<p class="more"><a href="3" onmouseout="MM_swapImgRestore()" onmouseover="MM_swapImage('Image11','','images/anniu.gif',1)"><img src="images/anniu2.gif" name="Image11" width="133" height="28" border="0" id="Image11" /></a></p>
</div>
</div>
<div class="zhichi">
<h2>技术支持</h2>
<ul>
<li>
<p><a href="#"><img src="images/001.gif" width="128" height="42" /></a></p>
<p><span><a href="#">诺基亚</a></span></p>
<p>提供最新的手机服务</p>
</li>
<li>
<p><a href="#"><img src="images/002.gif" width="128" height="42" /></a></p>
<p><span><a href="#">摩托罗拉</a></span></p>
<p>三大业务集团</p>
</li>
<li>
<p><a href="#"><img src="images/003.gif" width="128" height="42" /></a></p>
<p><span><a href="#">诺基亚</a></span></p>
<p>提供最新的手机服务</p>
</li>
<li>
<p><a href="#"><img src="images/002.gif" width="128" height="42" /></a></p>
<p><span><a href="#">诺基亚</a></span></p>
<p>提供最新的手机服务</p>
</li>
<li>
<p><a href="#"><img src="images/003.gif" width="128" height="42" /></a></p>
<p><span><a href="#">诺基亚</a></span></p>
<p>提供最新的手机服务</p>
</li>
</ul>
</div>
</div>
<div id="jishu-right">
<div class="news">
<h2>最新公告</h2>
<ul>
<li><a href="#">SNT V2.7.3 20121106 正式版发布</a></li>
<li><a href="#">SNT V2.7.3 20121106 正式版发布</a></li>
<li><a href="#">SNT V2.7.3 20121106 正式版发布</a></li>
<li><a href="#">SNT V2.7.3 20121106 正式版发布</a></li>
<li><a href="#">SNT V2.7.3 20121106 正式版发布</a></li>
<li><a href="#">SNT V2.7.3 20121106 正式版发布</a></li>
<li><a href="#">SNT V2.7.3 20121106 正式版发布</a></li>
</ul>
</div>
<div class="news">
<h2>最新新闻</h2>
<ul>
<li><a href="#">SNT V2.7.3 20121106 正式版发布</a></li>
<li><a href="#">SNT V2.7.3 20121106 正式版发布</a></li>
<li><a href="#">SNT V2.7.3 20121106 正式版发布</a></li>
<li><a href="#">SNT V2.7.3 20121106 正式版发布</a></li>
<li><a href="#">SNT V2.7.3 20121106 正式版发布</a></li>
<li><a href="#">SNT V2.7.3 20121106 正式版发布</a></li>
<li><a href="#">SNT V2.7.3 20121106 正式版发布</a></li>
</ul>
</div>
</div>
</div>
</div>
<div id="footer">
<div class="link">
<div class="link-left">
友情链接:
</div>
<div class="link-right">
<p><a href="#">多玩暗黑3专区</a> |<a href="#"> 盛世三国</a> |<a href="#"> 西游3</a> | <a href="#">多玩魔兽世界专区</a> | <a href="#">仙妮蕾德</a> | <a href="#">07073动漫网</a> | <a href="#">宅人网下载</a> |<a href="#"> 免费网站申请</a> | <a href="#">魔兽世界中文网</a> |<a href="#"> 神仙道</a> |<a href="#"> 178新手卡 </a>| <a href="#">三界游戏网</a></p>
</div>
</div>
<div class="ft"></div>
<div class="snt">
<div class="snt-left"><img src="images/snt2.gif" width="66" height="25" /></div>
<div class="snt-right">
<p><a href="#">返回首页</a> | <a href="#">关于我们</a> | <a href="#">隐私政策</a> <a href="#">|充值中心</a> | <a href="#">在线客服</a></p>
<p>版权所有:lonlife 网游加速器 豫ICP备11008357号</p>
</div>
</div>
</div>
</body>
</html>
Drupal版本:
3.2 login.html源代码
作者:老葛,北京亚艾元软件有限责任公司,http://www.yaiyuan.com
比较长。我们来看login.html的代码:
<!DOCTYPE html PUBLIC "-//W3C//DTD XHTML 1.0 Transitional//EN" "http://www.w3.org/TR/xhtml1/DTD/xhtml1-transitional.dtd">
<html xmlns="http://www.w3.org/1999/xhtml">
<head>
<meta http-equiv="Content-Type" content="text/html; charset=utf-8" />
<title>SNT</title>
<link href="css/css.css" rel="stylesheet" type="text/css" />
</head>
<body>
<div id="main">
<div id="top">
<div id="top-left">
<div class="logo"><span>SNT</span>代理</div>
<div class="logoright">
<p>super network tunnel</p>
<p>突破所有网络限制</p>
</div>
</div>
<div id="top-right">
<p><span class="weibo"><a href="#">官方微博</a></span> | <span class="weibo"><a href="#">帮助中心</a></span> <span class="zd"><a href="#">注册</a></span> <span class="zd"><a href="#">登陆</a></span></p>
<p class="kefu">客服电话:400-680-6666</p>
</div>
</div>
<div id="nav">
<div id="nav-left"></div>
<div id="nav-middle">
<ul>
<li><a href="#">首页</a></li>
<li><a href="#">下载</a></li>
<li><a href="#">充值</a></li>
<li><a href="#">我的账户</a></li>
<li><a href="#">业务支持</a></li>
<li><a href="#">新手指引</a></li>
</ul>
</div>
<div id="nav-right"></div>
</div>
<div id="ziye">
<div class="ziye-left">
<p class="daohang"><a href="#">首页</a> > <a href="#">业务支持</a></p>
<p><img src="images/ziyebanner.gif" width="701" height="109" /></p>
<div class="nei">
<div class="login">
<table width="295" border="0" align="center">
<tr>
<td class="yhzc" colspan="3">用户登陆</td>
</tr>
<tr>
<td width="60" class="mima">账号:</td>
<td><label>
<input class="wbk" type="text" name="textfield" id="textfield" />
</label></td>
<td class="hb"> </td>
</tr>
<tr>
<td class="mima">密码:</td>
<td><label>
<input class="wbk" type="text" name="textfield2" id="textfield2" />
</label></td>
<td class="hb"> </td>
</tr>
<tr>
<td class="mima"></td>
<td><input name="" type="checkbox" value="" /><span class="zidong">两周内自动登录</span></td>
<td class="hb"></td>
</tr>
<tr>
<td class="xib" colspan="3"><input name="" type="submit" class="anniu2" value="" /></td>
</tr>
</table>
</div>
</div>
</div>
<div class="ziye-right">
<div id="banner-right">
<p><img src="images/br.gif" width="253" height="8" /></p>
<div class="br-middle">
<p class="xiazai"><img src="images/snt.gif" width="217" height="26" /></p>
<p class="banben">软件版本:2.36.116</p>
<p class="banben">软件大小:4.95M</p>
<p class="banben">适用平台:所有windows</p>
<p class="banben2">最近更新:2012-12-3</p><p><a href="#"><img src="images/xiazai.gif" width="222" height="76" /></a></p>
</div>
<div class="br-bottom"></div>
</div>
<div id="jishu-right2">
<div class="news">
<h2>最新公告</h2>
<ul>
<li><a href="#">SNT V2.7.3 20121106 正式版发布</a></li>
<li><a href="#">SNT V2.7.3 20121106 正式版发布</a></li>
<li><a href="#">SNT V2.7.3 20121106 正式版发布</a></li>
<li><a href="#">SNT V2.7.3 20121106 正式版发布</a></li>
<li><a href="#">SNT V2.7.3 20121106 正式版发布</a></li>
<li><a href="#">SNT V2.7.3 20121106 正式版发布</a></li>
<li><a href="#">SNT V2.7.3 20121106 正式版发布</a></li>
</ul>
</div>
<div class="news">
<h2>最新新闻</h2>
<ul>
<li><a href="#">SNT V2.7.3 20121106 正式版发布</a></li>
<li><a href="#">SNT V2.7.3 20121106 正式版发布</a></li>
<li><a href="#">SNT V2.7.3 20121106 正式版发布</a></li>
<li><a href="#">SNT V2.7.3 20121106 正式版发布</a></li>
<li><a href="#">SNT V2.7.3 20121106 正式版发布</a></li>
<li><a href="#">SNT V2.7.3 20121106 正式版发布</a></li>
<li><a href="#">SNT V2.7.3 20121106 正式版发布</a></li>
</ul>
</div>
</div>
</div>
</div>
</div>
<div id="footer">
<div class="link">
<div class="link-left">
友情链接:
</div>
<div class="link-right">
<p><a href="#">多玩暗黑3专区</a> |<a href="#"> 盛世三国</a> |<a href="#"> 西游3</a> | <a href="#">多玩魔兽世界专区</a> | <a href="#">仙妮蕾德</a> | <a href="#">07073动漫网</a> | <a href="#">宅人网下载</a> |<a href="#"> 免费网站申请</a> | <a href="#">魔兽世界中文网</a> |<a href="#"> 神仙道</a> |<a href="#"> 178新手卡 </a>| <a href="#">三界游戏网</a></p>
</div>
</div>
<div class="ft"></div>
<div class="snt">
<div class="snt-left"><img src="images/snt2.gif" width="66" height="25" /></div>
<div class="snt-right">
<p><a href="#">返回首页</a> | <a href="#">关于我们</a> | <a href="#">隐私政策</a> <a href="#">|充值中心</a> | <a href="#">在线客服</a></p>
<p>版权所有:lonlife 网游加速器 豫ICP备11008357号</p>
</div>
</div>
</div>
</body>
</html>
其它页面我就不粘贴代码了,它们的结构和login.html一致。我们接下来需要对这些页面的HTML代码进行分析,就是打开所有的页面。我这里使用的是nodepad++。你也可以使用类似的工具。
Drupal版本:
3.3 HTML布局结构分析
这是login.html的结构:
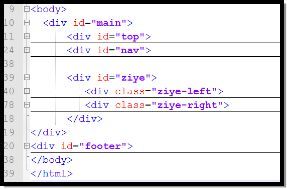
这是index.html的结构:
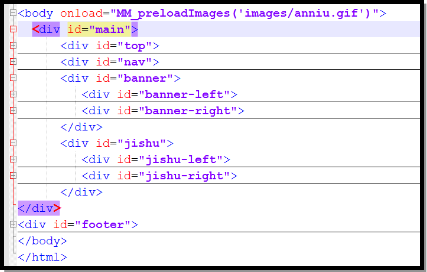
我们看到,在首页的中间部分,采用的是banner、jishu两个div的上下结构,而不是像其它页面的ziye-left、ziye-right的左右结构。希望读者读到这里的时候,认真的分析一下首页中间部分和其它页面的中间部分的不同之处。
我们这里是按照美工给什么,我们就输出什么的。但是我们会发现,美工在切图的时候,有的地方处理的有点小问题,它给我们程序员带来了更多的挑战。我们在这里只需要知道,首页并不是我们所想的左右结构,而是首先上下结构,然后左右结构。
我们这里先不去深究这一点,来分析一下top、nav、footer的结构。它们里面的内容在所有页面都是相同的,在实际项目当中,通常也都是这样的。
我们先来分析top的结构:

它里面包括top-left、top-right两个div;展开top-left,里面还是有结构的:

在这里面,我们看到,这个Logo,是一段文字,而不是一个图片,所以我们这里面,不需要使用Drupal页面模板里面的logo变量,我们只需要把它处理成为一个区块就可以了。我们这里面,在划分区域的时候,有三种方案:
1) 分一个区域:top。
2) 分两个区域:top-left、top-right。
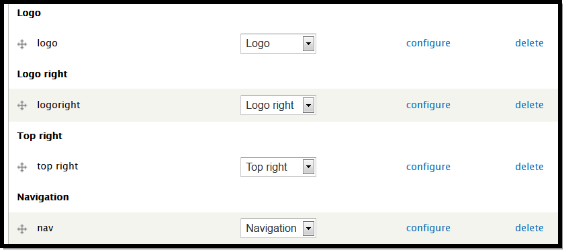
3) 分三个区域:logo、logoright、top-right。
每个人的喜好不同,习惯也不一样。这三种方案,都是可行的,在这里面,我喜欢第三种方案。我喜欢多分几个区域,反正是固定不变的,区域分的越细,区块里面的HTML markup就越少。
我们来看nav的结构:
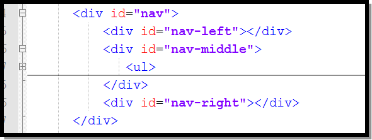
我们看到里面分为nav-left、nav-middle、nav-right,实际上这里的nav-left和nav-right里面是没有内容的,即便是把它们去掉,也不影响。所以我们这里只设置一个区域nav。
我们来看ziye的结构:
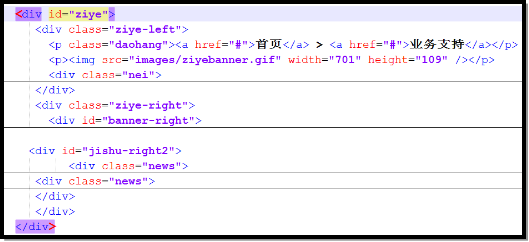
我们前期可以先把ziye-left处理成为content区域,也就是主内容区域。我在相当长的时间内,一直以为Drupal7里面,content区域是必须要有的,这在Drupal6下面是正确的,但是在Drupal7下,content区域已经不是必须的,我也是在前两天研究Drupal7主题的时候,才发现的。
我们看到ziye-right下面,分为banner-right、jishu-right2;而jishu-right2里面又包含两个news,其实我觉得,这里面的两个news,应该和banner-right并列才对,不知道美工在这里是怎么想的,我们总不能把banner-right、jishu-right2分成两个独立的区域吧。这里的HTML结构有点不合理的。
我们这里,把中间的部分,分成两个区域,content和ziye-right。后面我们会继续细化、调整的。
现在来看footer,它的HTML结构:

这里面,footer里面包含link、ft、snt;其中link里面包含link-left、link-right;ft里面为空;snt里面又分为snt-left、snt-right。区域的划分,也有多种方案:
1) 分一个区域:footer。
2) 分两个区域:link、snt。
3) 分三个区域:link、snt-left、snt-right。
4) 分四个区域:link-left、link-right、snt-left、snt-right。
这里面,我们采用第3种方案,也就是分三个区域的方案。这样我们普通页面的区域划分,就基本确定了下来,对于首页,我们暂时不去考虑它,因为我们后面会单独的为它制作页面模板。
实际上,对于这种静态HTML结构的分析,是必不可少的,尽管这里占了不小的篇幅。就是在转Drupal主题的前期,我们要充分的了解美工提供的静态HTML。我们现在继续。
Drupal版本:
4 创建自己的主题
作者:老葛,北京亚艾元软件有限责任公司,http://www.yaiyuan.com
我们新建一个站点,把这个站点命名为snt1吧,因为我本地已经有了一个snt,是的,这个例子我已经给很多人讲了不止一次了。不过snt1已经用了,所以我们这里就用snt2了。安装的过程在这里就不说了,此外,简体中文也不装了。我们只讲主题制作。
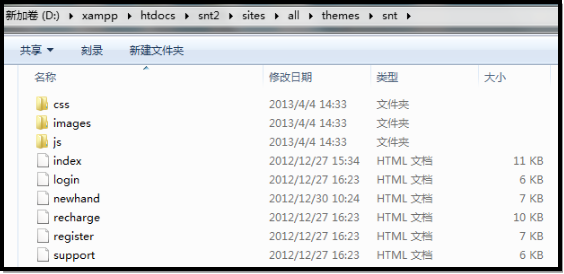
现在导航到snt2\sites\all\themes目录下面,创建一个子文件夹snt,然后将我们的静态页面复制过来。把静态页面复制过来,只是为了方便。如图所示。
Drupal版本:
5 创建主题的info文件
作者:老葛,北京亚艾元软件有限责任公司,http://www.yaiyuan.com
接下来,我们创建snt.info文件,实际上,我从来都是复制重命名的。就是将一个现有的主题的info文件复制过来,然后重命名为snt.info。由于前面我们已经初步的确定了区域。我是从bookstore.info复制过来的。
这是我做好的样子:
screenshot = screenshot.png
name = SNT
description = SNT 演示主题.
core = 7.x
stylesheets[all][] = css/css.css
stylesheets[all][] = css/custom.css
;scripts[] = js/script.js
regions[logo] = Logo
regions[logoright] = Logo right
regions[top_right] = Top right
regions[nav] = Navigation
regions[content] = Content
regions[ziye_right] = Ziye right
regions[link] = Link
regions[snt_left] = Snt left
regions[snt_right] = Snt right
; The page_top and page_bottom regions are hidden, which means they will not
; show up on the blocks administration page. But they are required in order for
; the html.tpl.php to work properly, so do not delete them.
regions[page_top] = Page top
regions[page_bottom] = Page bottom
前面的四个键值对,我就不多讲了。
stylesheets[all][]是用来指定CSS文件的,这里指定的CSS文件在当前主题的所有页面都会加载,我们这里只有一个CSS文件css/css.css,这是美工提供的CSS文件;在这里,我们在sites\all\themes\snt\css文件夹下面创建一个custom.css文件,这个文件里面放置我们程序员的CSS代码。这样的好处,就是说,程序员不需要去修改美工的CSS文件,我们在后面覆写主题模板文件的时候,很多时候,是需要调整CSS。将后期的CSS覆写代码,单独放在custom.css文件中,能够给我们带来管理上的方便。不然的话,程序员修改了CSS,美工又调整了自己的CSS,此时会遇到工作的合并问题。
scripts[]用来指定主题加载的JavaScript文件,我们这里前期不需要加载JS文件,只有在制作首页的时候,可能才会加载,所以我们保留了scripts[]这行代码,这里把它注释掉了,将来用的时候会比较方便。
再往下,就是我们设置的区域了,我们在前面分析静态HTML区域的时候,已经分析了要设置哪些区域,所以到这里就水到渠成了。
regions[logo] = Logo
regions[logoright] = Logo right
regions[top_right] = Top right
regions[nav] = Navigation
regions[content] = Content
regions[ziye_right] = Ziye right
regions[link] = Link
regions[snt_left] = Snt left
regions[snt_right] = Snt right
注意这里面,中括号里面,是没有加引号的;中括号里面的是机读名字,除了content以外,这里的机读名字,和静态HTML里面的ID或者Class是保持一致的;有一点需要说明一下,就是这里使用的是下划线,在静态HTML里面使用的是连字符;还有就是这里的机读名字,你想怎么起,就怎么起,只要符合PHP的变量规范就可以了,即便是content区域,也不是必须的,我们也可以将它替换掉,只不过我们这里沿用了传统的方式。右边是区域的用户可读名字,首字母这里大写了。
最后,两行代码:
regions[page_top] = Page top
regions[page_bottom] = Page bottom
这是必不可少的,隐藏的两个区域,在所有的Drupal主题里面都要定义,不过如果你不定义的话,问题可能也不大,自己可以尝试一下。有兴趣的读者,可以打开snt2\modules\system下面的html.tpl.php文件,里面有这么几行代码:
<?php print $page_top; ?>
<?php print $page; ?>
<?php print $page_bottom; ?>
这里的$page_top和$page_bottom两个变量,就是由前面我们定义的两个区域来负责的。
这样我们主题的info文件就创建好了,info文件里面还有很多其它可以使用的键值对,我们这里用不到,所以就不去讲解了。我们现在,在主题文件夹下面,创建一个templates文件夹,里面用来放置我们的模板文件。
Drupal版本:
6 默认的模板文件
作者:老葛,北京亚艾元软件有限责任公司,http://www.yaiyuan.com
接下来,我们将modules\system下面的html.tpl.php文件,复制到templates文件夹下面,如果不复制过来,默认仍然会使用modules\system下面的html.tpl.php,复制过来有个好处,将来覆写这个模板文件的时候方便。
Drupal版本:
6.1 html.tpl.php
作者:老葛,北京亚艾元软件有限责任公司,http://www.yaiyuan.com
我们来看一下这个模板文件:
/**
* @file
* Default theme implementation to display the basic html structure of a single
* Drupal page.
*
* Variables:
* - $css: An array of CSS files for the current page.
* - $language: (object) The language the site is being displayed in.
* $language->language contains its textual representation.
* $language->dir contains the language direction. It will either be 'ltr' or 'rtl'.
* - $rdf_namespaces: All the RDF namespace prefixes used in the HTML document.
* - $grddl_profile: A GRDDL profile allowing agents to extract the RDF data.
* - $head_title: A modified version of the page title, for use in the TITLE
* tag.
* - $head_title_array: (array) An associative array containing the string parts
* that were used to generate the $head_title variable, already prepared to be
* output as TITLE tag. The key/value pairs may contain one or more of the
* following, depending on conditions:
* - title: The title of the current page, if any.
* - name: The name of the site.
* - slogan: The slogan of the site, if any, and if there is no title.
* - $head: Markup for the HEAD section (including meta tags, keyword tags, and
* so on).
* - $styles: Style tags necessary to import all CSS files for the page.
* - $scripts: Script tags necessary to load the JavaScript files and settings
* for the page.
* - $page_top: Initial markup from any modules that have altered the
* page. This variable should always be output first, before all other dynamic
* content.
* - $page: The rendered page content.
* - $page_bottom: Final closing markup from any modules that have altered the
* page. This variable should always be output last, after all other dynamic
* content.
* - $classes String of classes that can be used to style contextually through
* CSS.
*
* @see template_preprocess()
* @see template_preprocess_html()
* @see template_process()
*
* @ingroup themeable
*/
?><!DOCTYPE html PUBLIC "-//W3C//DTD XHTML+RDFa 1.0//EN"
"http://www.w3.org/MarkUp/DTD/xhtml-rdfa-1.dtd">
<html xmlns="http://www.w3.org/1999/xhtml" xml:lang="<?php print $language->language; ?>" version="XHTML+RDFa 1.0" dir="<?php print $language->dir; ?>"<?php print $rdf_namespaces; ?>>
<head profile="<?php print $grddl_profile; ?>">
<?php print $head; ?>
<title><?php print $head_title; ?></title>
<?php print $styles; ?>
<?php print $scripts; ?>
</head>
<body class="<?php print $classes; ?>" <?php print $attributes;?>>
<div id="skip-link">
<a href="#main-content" class="element-invisible element-focusable"><?php print t('Skip to main content'); ?></a>
</div>
<?php print $page_top; ?>
<?php print $page; ?>
<?php print $page_bottom; ?>
</body>
</html>
在这个模板文件的上面,是注释,核心自带的模板文件里面,都有注释的,注释里面给出了当前模板文件里面可用的变量;在注释的结尾处,给出了预处理函数、处理函数,我们这里使用的变量都是在这些预处理函数、处理函数里面定义的。
我们看到,html.tpl.php模板文件里面,主要负责head里面变量的输出,里面包含$head、$head_title、$styles、$scripts,后面的两个变量,分别负责样式、脚本的输出,我们在info文件里面定义的stylesheets和scripts就是通过这两个变量输出的。而在body里面,主要是输出$page,其它都是起辅助作用的。
在Drupal6里面,这些变量内容,其实是放在page.tpl.php里面,由于每个页面的这部分内容,基本上是比较固定的,所在Drupal7里面,就将其独立成一个单独的文件了,这样page.tpl.php里面的内容,就少了很多。
template_preprocess和template_process里面定义的变量,在所有的模板文件里面都可以使用。在里面主要定义了下面四个变量:
$variables['zebra'] = ($count[$hook] % 2) ? 'odd' : 'even';
$variables['id'] = $count[$hook]++;
// Tell all templates where they are located.
$variables['directory'] = path_to_theme();
// Initialize html class attribute for the current hook.
$variables['classes_array'] = array(drupal_html_class($hook));
此外,还有一些默认变量是通过_template_preprocess_default_variables定义,这些变量大致包括:
$variables = array(
'attributes_array' => array(),
'title_attributes_array' => array(),
'content_attributes_array' => array(),
'title_prefix' => array(),
'title_suffix' => array(),
'user' => $user,
'db_is_active' => !defined('MAINTENANCE_MODE'),
'is_admin' => FALSE,
'logged_in' => FALSE,
);
$variables['is_front'] = drupal_is_front_page();
在template_process里面,也可以定义变量,不过这些变量,都是直接来源于预处理函书中的,比如:
$variables['classes'] = implode(' ', $variables['classes_array']);
处理函数中的classes变量,就是直接根源于预处理函数中的classes_array,只不过将它从数组的形式转成了字符串。
template_preprocess_html定义了一些变量:
$variables['classes_array'][] = $variables['is_front'] ? 'front' : 'not-front';
$variables['rdf_namespaces'] = drupal_get_rdf_namespaces();
$variables['grddl_profile'] = 'http://www.w3.org/1999/xhtml/vocab';
$variables['language'] = $GLOBALS['language'];
$variables['language']->dir = $GLOBALS['language']->direction ? 'rtl' : 'ltr';
$variables['head_title_array'] = $head_title;
$variables['head_title'] = implode(' | ', $head_title);
$variables['theme_hook_suggestions'] = $suggestions;
我们注意到,好几个变量都没有在这里定义,此时我们可以尝试Google一下template_process_html,在api.drupal.org找到这个函数的定义,里面就有我们在模板里面用到的变量:
// Render page_top and page_bottom into top level variables.
$variables['page_top'] = drupal_render($variables['page']['page_top']);
$variables['page_bottom'] = drupal_render($variables['page']['page_bottom']);
// Place the rendered HTML for the page body into a top level variable.
$variables['page'] = $variables['page']['#children'];
$variables['page_bottom'] .= drupal_get_js('footer');
$variables['head'] = drupal_get_html_head();
$variables['css'] = drupal_add_css();
$variables['styles'] = drupal_get_css();
$variables['scripts'] = drupal_get_js();
我们在这里,只需要知道变量是在预处理函数、处理函数里面定义的即可,用到的时候再去查找相应的函数。还有一个问题,Drupal是怎么把模板文件和对应的变量合并成HTML片段的,经常有人问这个问题,这时通过theme_render_template函数完成的,我们在第4集的时候,简单的介绍过这个函数。
我们在html.tpl.php里面使用这么两句话输出CSS、JS文件:
<?php print $styles; ?>
<?php print $scripts; ?>
在实际的项目中,我们还经常这样用:
<?php print $styles; ?>
<link href="<?php print base_path().path_to_theme(); ?>/css/mycss.css" rel="stylesheet" type="text/css" />
<?php print $scripts; ?>
<script src="<?php print base_path().path_to_theme(); ?>/js/jquery-1.4a2.min.js" type="text/javascript"></script>
我们直接在模板文件里面输出了CSS、JS文件,而不是通过主题的info文件,这不是什么Drupal高手推荐的方式,但是却是在实际项目当中,用的最多的一种方式。另外,就是这里的base_path().path_to_theme(),这两个函数,我们在后面还会用到。我们这里也可以使用$base_path.$directory,效果是一样的,不过我更喜欢直接使用函数的形式。注意,变量的形式,只能用于模板文件中,而函数的形式,适用的范围更广泛一些。
Drupal版本:
6.2 page.tpl.php
作者:老葛,北京亚艾元软件有限责任公司,http://www.yaiyuan.com
接下来,我们将modules\system下面的page.tpl.php文件,复制到sites\all\themes\snt\templates文件夹下面。我建议每个学习Drupal的用户,都把这个默认模板文件看上几遍。
<?php
/**
* @file
* Default theme implementation to display a single Drupal page.
*
* The doctype, html, head and body tags are not in this template. Instead they
* can be found in the html.tpl.php template in this directory.
*
* Available variables:
*
* General utility variables:
* - $base_path: The base URL path of the Drupal installation. At the very
* least, this will always default to /.
* - $directory: The directory the template is located in, e.g. modules/system
* or themes/bartik.
* - $is_front: TRUE if the current page is the front page.
* - $logged_in: TRUE if the user is registered and signed in.
* - $is_admin: TRUE if the user has permission to access administration pages.
*
* Site identity:
* - $front_page: The URL of the front page. Use this instead of $base_path,
* when linking to the front page. This includes the language domain or
* prefix.
* - $logo: The path to the logo image, as defined in theme configuration.
* - $site_name: The name of the site, empty when display has been disabled
* in theme settings.
* - $site_slogan: The slogan of the site, empty when display has been disabled
* in theme settings.
*
* Navigation:
* - $main_menu (array): An array containing the Main menu links for the
* site, if they have been configured.
* - $secondary_menu (array): An array containing the Secondary menu links for
* the site, if they have been configured.
* - $breadcrumb: The breadcrumb trail for the current page.
*
* Page content (in order of occurrence in the default page.tpl.php):
* - $title_prefix (array): An array containing additional output populated by
* modules, intended to be displayed in front of the main title tag that
* appears in the template.
* - $title: The page title, for use in the actual HTML content.
* - $title_suffix (array): An array containing additional output populated by
* modules, intended to be displayed after the main title tag that appears in
* the template.
* - $messages: HTML for status and error messages. Should be displayed
* prominently.
* - $tabs (array): Tabs linking to any sub-pages beneath the current page
* (e.g., the view and edit tabs when displaying a node).
* - $action_links (array): Actions local to the page, such as 'Add menu' on the
* menu administration interface.
* - $feed_icons: A string of all feed icons for the current page.
* - $node: The node object, if there is an automatically-loaded node
* associated with the page, and the node ID is the second argument
* in the page's path (e.g. node/12345 and node/12345/revisions, but not
* comment/reply/12345).
*
* Regions:
* - $page['help']: Dynamic help text, mostly for admin pages.
* - $page['highlighted']: Items for the highlighted content region.
* - $page['content']: The main content of the current page.
* - $page['sidebar_first']: Items for the first sidebar.
* - $page['sidebar_second']: Items for the second sidebar.
* - $page['header']: Items for the header region.
* - $page['footer']: Items for the footer region.
*
* @see template_preprocess()
* @see template_preprocess_page()
* @see template_process()
* @see html.tpl.php
*
* @ingroup themeable
*/
?>
<div id="page-wrapper"><div id="page">
<div id="header"><div class="section clearfix">
<?php if ($logo): ?>
<a href="<?php print $front_page; ?>" title="<?php print t('Home'); ?>" rel="home" id="logo">
<img src="<?php print $logo; ?>" alt="<?php print t('Home'); ?>" />
</a>
<?php endif; ?>
<?php if ($site_name || $site_slogan): ?>
<div id="name-and-slogan">
<?php if ($site_name): ?>
<?php if ($title): ?>
<div id="site-name"><strong>
<a href="<?php print $front_page; ?>" title="<?php print t('Home'); ?>" rel="home"><span><?php print $site_name; ?></span></a>
</strong></div>
<?php else: /* Use h1 when the content title is empty */ ?>
<h1 id="site-name">
<a href="<?php print $front_page; ?>" title="<?php print t('Home'); ?>" rel="home"><span><?php print $site_name; ?></span></a>
</h1>
<?php endif; ?>
<?php endif; ?>
<?php if ($site_slogan): ?>
<div id="site-slogan"><?php print $site_slogan; ?></div>
<?php endif; ?>
</div> <!-- /#name-and-slogan -->
<?php endif; ?>
<?php print render($page['header']); ?>
</div></div> <!-- /.section, /#header -->
<?php if ($main_menu || $secondary_menu): ?>
<div id="navigation"><div class="section">
<?php print theme('links__system_main_menu', array('links' => $main_menu, 'attributes' => array('id' => 'main-menu', 'class' => array('links', 'inline', 'clearfix')), 'heading' => t('Main menu'))); ?>
<?php print theme('links__system_secondary_menu', array('links' => $secondary_menu, 'attributes' => array('id' => 'secondary-menu', 'class' => array('links', 'inline', 'clearfix')), 'heading' => t('Secondary menu'))); ?>
</div></div> <!-- /.section, /#navigation -->
<?php endif; ?>
<?php if ($breadcrumb): ?>
<div id="breadcrumb"><?php print $breadcrumb; ?></div>
<?php endif; ?>
<?php print $messages; ?>
<div id="main-wrapper"><div id="main" class="clearfix">
<div id="content" class="column"><div class="section">
<?php if ($page['highlighted']): ?><div id="highlighted"><?php print render($page['highlighted']); ?></div><?php endif; ?>
<a id="main-content"></a>
<?php print render($title_prefix); ?>
<?php if ($title): ?><h1 class="title" id="page-title"><?php print $title; ?></h1><?php endif; ?>
<?php print render($title_suffix); ?>
<?php if ($tabs): ?><div class="tabs"><?php print render($tabs); ?></div><?php endif; ?>
<?php print render($page['help']); ?>
<?php if ($action_links): ?><ul class="action-links"><?php print render($action_links); ?></ul><?php endif; ?>
<?php print render($page['content']); ?>
<?php print $feed_icons; ?>
</div></div> <!-- /.section, /#content -->
<?php if ($page['sidebar_first']): ?>
<div id="sidebar-first" class="column sidebar"><div class="section">
<?php print render($page['sidebar_first']); ?>
</div></div> <!-- /.section, /#sidebar-first -->
<?php endif; ?>
<?php if ($page['sidebar_second']): ?>
<div id="sidebar-second" class="column sidebar"><div class="section">
<?php print render($page['sidebar_second']); ?>
</div></div> <!-- /.section, /#sidebar-second -->
<?php endif; ?>
</div></div> <!-- /#main, /#main-wrapper -->
<div id="footer"><div class="section">
<?php print render($page['footer']); ?>
</div></div> <!-- /.section, /#footer -->
</div></div> <!-- /#page, /#page-wrapper -->
这仍然是HTML里面嵌套了对应的变量,这里面的变量很多,但是实际上,最常用的是区域变量,它们的调用方式都是一样的:
<?php print render($page['footer']); ?>
像page.tpl.php里面特有的变量,比如$logo、$breadcrumb,以及主导航链接,二级导航链接的输出,正在被区块的形式所取代。统一采用区块的形式,学习起来更易于掌握。
Drupal版本:
7 创建自己的page.tpl.php
作者:老葛,北京亚艾元软件有限责任公司,http://www.yaiyuan.com
现在我们要做的工作,是将静态HTML页面body里面的代码全部复制到page.tpl.php文件里面来,这里的HTML是从login.html里面复制过来的。我通常将这些静态的HTML放到注释的后面,原来代码的前面。我们要将里面的静态HTML,替换成对应的变量了。
这是没有替换前的样子:
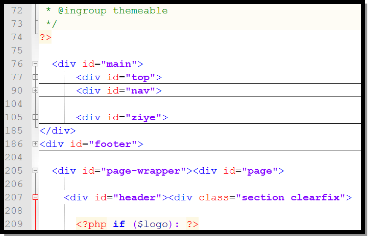
我们里面的代码折叠了起来。
我们现在开始替换,首先看logo,原来是这样的:
<div class="logo"><span>SNT</span>代理</div>
我们看到logo是文字形式的,我们这里把它处理成为区域的形式了,这是替换后的样子:
<div class="logo"><?php print render($page['logo']); ?></div>
我们依次这样替换,这是第一轮替换后的样子;
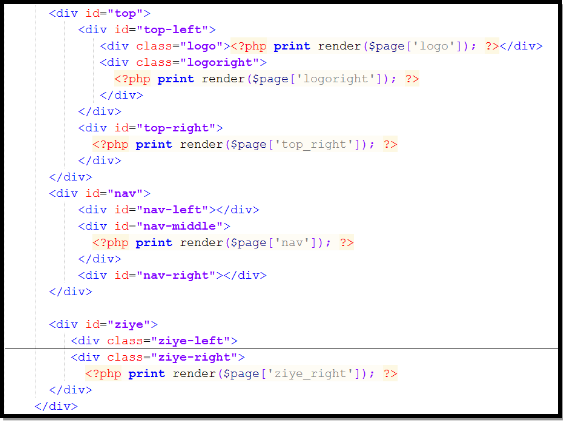
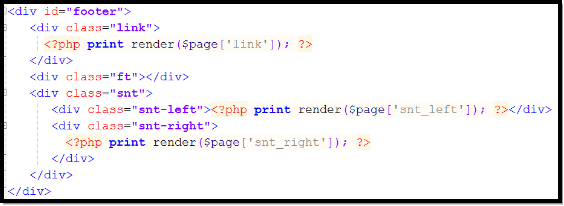
我总是把主内容区域的输出,放在最后才替换。先易后难。我们现在来看主内容这块,首先是面包屑导航。
<p class="daohang"><a href="#">首页</a> > <a href="#">业务支持</a></p>
我们将其替换为:
<?php if ($breadcrumb): ?>
<p class="daohang"><?php print $breadcrumb; ?></p>
<?php endif; ?>
Drupal里面,常使用这样的if语句,来输出变量,这样在变量为空的时候,相关的HTML也就可以不输出了。我们来看一下核心的代码:

这里面输出了变量$messages,我们这里也把这个变量输出来,然后放到面包屑代码片段的下面。很多人做项目的时候,经常把这个给忘记了。
接下来,我们将这段HTML删除:

这就是主内容区域所在的位置。然后在同样的位置,将这段代码复制粘贴进来:
<?php if ($page['highlighted']): ?><div id="highlighted"><?php print render($page['highlighted']); ?></div><?php endif; ?>
<a id="main-content"></a>
<?php print render($title_prefix); ?>
<?php if ($title): ?><h1 class="title" id="page-title"><?php print $title; ?></h1><?php endif; ?>
<?php print render($title_suffix); ?>
<?php if ($tabs): ?><div class="tabs"><?php print render($tabs); ?></div><?php endif; ?>
<?php print render($page['help']); ?>
<?php if ($action_links): ?><ul class="action-links"><?php print render($action_links); ?></ul><?php endif; ?>
<?php print render($page['content']); ?>
<?php print $feed_icons; ?>
如果你对这些变量不熟悉的话,没有关系,我建议开始的时候把它们都输出出来,当我们发现信息显示的多了的时候,再删除相应的变量。$title是负责输出标题的;$title_prefix和$title_suffix是标题的前缀和后缀;$tabs用来输出标签,我们平时看到的查看、编辑标签,就是通过这个变量输出的;$action_links是动作链接,比如管理内容页面的添加内容链接,就是通过这个变量输出的;'highlighted'和'help'是两个辅助性质的区域,核心模板文件里面带的,我建议,我们这里把这两个区域也加上;$feed_icons是用来输出RSS订阅链接的。
我们现在,就在snt.info文件里面把'highlighted'和'help'这两个区域给加上:
regions[highlighted] = Highlighted
regions[help] = Help
到此为止,我们的这个page.tpl.php基本上就替换完了。现在我们可以把这个模板文件中的原来复制过来的代码给删除了,不然内容会重复的显示。删除完毕,保存page.tpl.php。
讲到page.tpl.php的时候,有人问过这样的问题,render的用法,以及与drupal_render之间的区别。其实我们可以看一下render的源代码,比较简单:
function render(&$element) {
if (is_array($element)) {
show($element);
return drupal_render($element);
}
else {
// Safe-guard for inappropriate use of render() on flat variables: return
// the variable as-is.
return $element;
}
}
如果是数组的话,就是用drupal_render输出,否则直接返回。在Drupal6的时候,对于页面回调,我们通常这样写代码:
$output = '';
$output .= '123456';
return $output;
但是在Drupal7下,标准的格式是这样的:
$render_array = array();
$render_array['#markup'] = '123456';
return $render_array;
返回的是数组的形式,不过在Drupal7下,也可以返回字符串的形式,这是对Drupal6原有用法的一个兼容,render函数其实就是负责这一兼容工作的,就是说,在返回字符串的情况下,也能正常工作。
Drupal版本:
8 启用主题
现在我们就可以启用这个新作的主题了,导航到admin/appearance,在这里找到SNT主题:
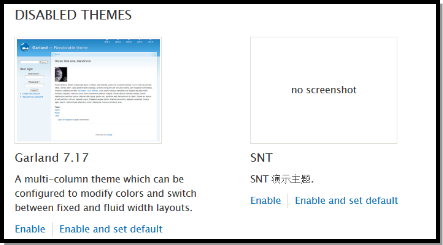
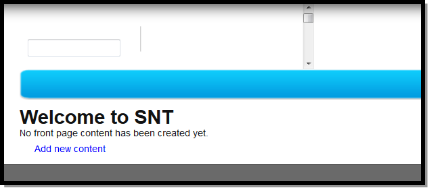
我们将它启用并设置为默认主题。现在我们回到首页,样式是比较乱的:
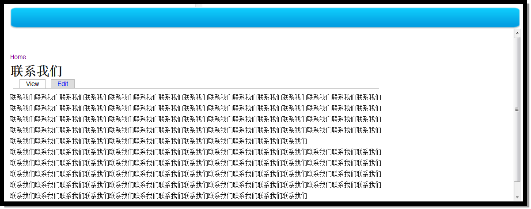
我们添加一篇文章“联系我们”,我们看到的样子:
Drupal版本:
9 创建静态区块
我们现在做一件事情,就是把头部、尾部、还有导航,还有右边栏的内容,把它们以静态区块的形式添加进来,这是我做Drupal主题的时候,采用的办法,就是说,先把样子显示出来,不至于在开始阶段,样子太乱,没有内容。
我们导航到admin/structure/block,在这里找到添加区块链接:
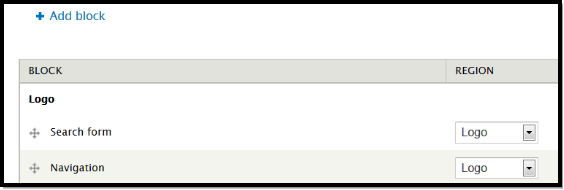
点击这个链接,进入区块的添加页面,这里面我们输入以下内容:
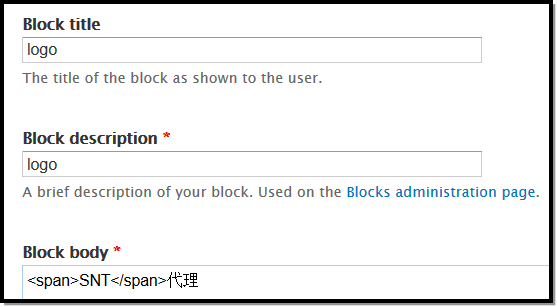
此外,对于文本格式,我们选择Full HTML:

对区域设置,我们将它放在Logo区域:

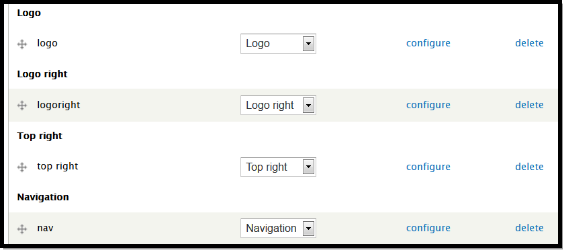
保存这个区块。这个时候,我们看到Logo区域里面还有很多其它区块,我们把这些无关的区块都去掉。我们添加了9个静态区块,里面的内容,就是我们在替换page.tpl.php时,替换掉的HTML。不要怕麻烦,以前我做Drupal主题的时候,都是这样,先放静态的,除了立即能够看到效果以外,还有一个好处,就是能够给我们确定一个目标,我们在后面,可以对这些静态区块逐一的改造升级。这是添加完的样子:
