2 表单覆写
作者:老葛,北京亚艾元软件有限责任公司,http://www.yaiyuan.com
表单覆写
Drupal版本:
2.1 Remember me模块
作者:老葛,北京亚艾元软件有限责任公司,http://www.yaiyuan.com
我们现在来看,登录表单页面的覆写,美工所给的表单元素里面,还包含一个复选框“两周内自动登录”,对于这个功能,我们可以使用Remember me模块。
1) 安装、启用Remember me模块。有时候,我觉得Remember me模块,仅仅是起到了一个心理安慰作用,因为本身Drupal就会记住你的用户名/登录状态,下次访问通常不需要登录。但是很多网站,还是需要这个功能。
2) 启用后,访问登录页面,我们看到多了一个复选框“Remember me”,并且默认是选中的。

如何将这段文本,改造为我们想要的中文?有两种办法,一个就是使用form_alter这个钩子函数,修改对应表单元素的标签;第二个方法,就是将对应的英文翻译成我们想要的中文。我在实际的很多项目中,都采用后一种办法。我们导航到admin/config/regional/translate,点击翻译标签,进入页面admin/config/regional/translate/translate,在这里,输入“Remember me”,过滤。
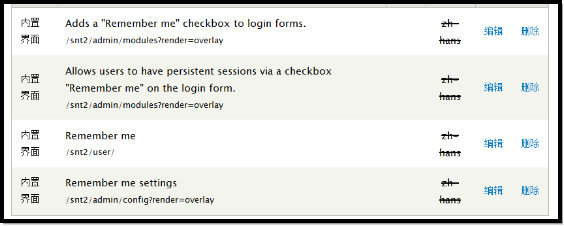
点击文本右边的编辑链接,即可将“Remember me”翻译成“两周内自动登录”。
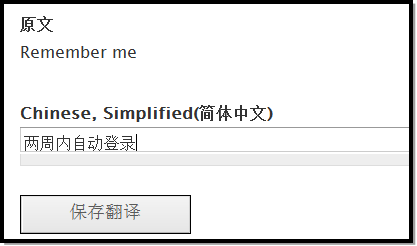
点击这里的“保存翻译”按钮。现在登录页面的内容,已经是我们想要的了。

我们现在来覆写这个表单页面,控制Drupal表单的输出,这是Drupal主题制作里面最富有技巧性质的。需要的知识比较多。我们这里的要求也比较简单,希望大家遇到了类似的问题,可以以我们的例子为参考,依葫芦画瓢,满足自己的需求即可。
Drupal版本:
2.2 在hook_theme中注册表单
作者:老葛,北京亚艾元软件有限责任公司,http://www.yaiyuan.com
1) 打开sites\all\themes\snt下面的template.php文件,向里面添加以下代码:
function snt_theme(&$existing, $typ
e, $theme, $path){
$hooks = array();
$hooks['user_login'] = array (
'template' => 'user-login',
'render element' => 'form',
'path' => drupal_get_path('theme','snt').'/templates',
//'preprocess functions' => array('snt_preprocess_user_login'),
);
return $hooks;
}
这段代码,实现了钩子hook_theme,在这里我们为user_login表单,声明了一个模板文件user-login.tpl.php,使用这个模板文件负责表单的输出,模板文件放在当前主题的templates目录里面。user_login是表单的ID,通过查看表单的HTML源代码,可以获得。
Drupal版本:
2.3 表单预处理函数
作者:老葛,北京亚艾元软件有限责任公司,http://www.yaiyuan.com
接着添加对应的预处理函数:
function snt_preprocess_user_login(&$variables) {
//$variables['intro_text'] = t('This is my awesome login form');
//$variables['form']['actions']['submit']['#attributes'] = array('class' => 'but');
$variables['name'] = drupal_render($variables['form']['name']);
$variables['pass'] = drupal_render($variables['form']['pass']);
$variables['submit'] = drupal_render($variables['form']['actions']['submit']);
//$variables['links'] = drupal_render($variables['form']['links']);
$variables['remember_me'] = drupal_render($variables['form']['remember_me']);
$variables['hidden'] = drupal_render_children($variables['form']);
}
在预处理函书里面,我们为模板文件提供变量,其实我们也可以不提供变量,在模板文件中直接输出表单元素。
Drupal版本:
2.4 为表单创建模板文件
作者:老葛,北京亚艾元软件有限责任公司,http://www.yaiyuan.com
1) 我们在sites\all\themes\snt\templates下面,创建user-login.tpl.php,里面放置以下内容:
<div class="login">
<table width="295" border="0" align="center">
<tr>
<td class="yhzc" colspan="3">用户登陆</td>
</tr>
<tr>
<td width="60" class="mima">账号:</td>
<td><label><?php print $name; ?></label></td>
<td class="hb"> </td>
</tr>
<tr>
<td class="mima">密码:</td>
<td><label><?php print $pass; ?></label></td>
<td class="hb"> </td>
</tr>
<tr>
<td class="mima"></td>
<td><?php print $remember_me;?></td>
<td class="hb"></td>
</tr>
<tr>
<td class="xib" colspan="3"><?php print $submit;?></td>
</tr>
</table>
<?php print $hidden ;?>
</div>
现在清除缓存,使用匿名用户访问user/login页面,我们看到的登录表单:
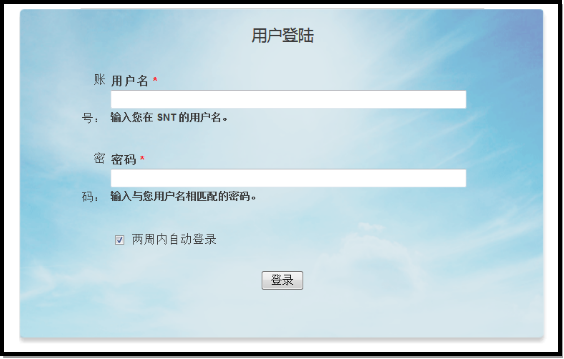
已经比较接近我们的需求了,只不过,还存在一些问题,比如表单元素的标签的重复输出,表单元素的描述不应该显示的问题,还有就是表单元素过长。
现在,如果使用Firebug查看页面源代码的话,我们发现,表单整体的HTML,已经被我们控制住了,但是表单元素的HTML,还没有控制住。
我们以用户名为例,我们的目标输出,是这个样子的:
<label><input class="wbk" type="text" name="textfield" id="textfield" /></label>
而实际,这里的输出,则有很多:

Drupal版本:
2.5 使用form_alter控制表单元素的theme_wrappers
作者:老葛,北京亚艾元软件有限责任公司,http://www.yaiyuan.com
1) 我们在template.php文件添加以下代码:
function snt_form_alter(&$form, &$form_state, $form_id) {
if ($form_id == 'user_login') {
$form['name']['#theme_wrappers'] = array();
$form['pass']['#theme_wrappers'] = array();
$form['submit']['#theme_wrappers'] = array();
$form['remember_me']['#theme_wrappers'] = array();
}
}
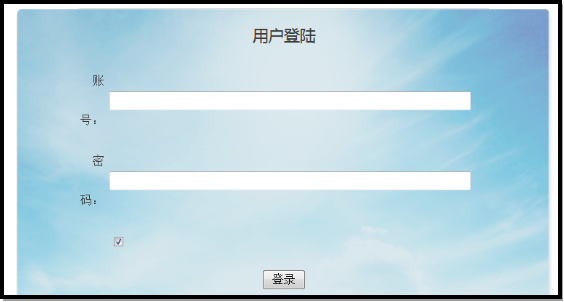
现在样式干净了很多。
Drupal版本:
2.6 为表单元素添加Class
作者:老葛,北京亚艾元软件有限责任公司,http://www.yaiyuan.com
问题还是存在,表单元素过长了,我们以用户名表单元素为例,分析一下目标代码和当前输出。
目标代码:
<label><input class="wbk" type="text" name="textfield" id="textfield" /></label>
当前输出:
<label>
<input id="edit-name" class="form-text required" type="text" maxlength="60" size="60" value="" name="name" tabindex="1">
</label>
在这里,id和name我们是必须要要使用Drupal默认的了,不然的话,就没有办法正常工作了。我想,我们应该把目标代码里面的class="wbk"给加上。这是我们修改后的form_alter函数,粗体表示新增的。
function snt_form_alter(&$form, &$form_state, $form_id) {
if ($form_id == 'user_login') {
$form['name']['#theme_wrappers'] = array();
$form['pass']['#theme_wrappers'] = array();
$form['submit']['#theme_wrappers'] = array();
$form['remember_me']['#theme_wrappers'] = array();
$form['name']['#attributes'] = array('class' => array('wbk'));
$form['pass']['#attributes'] = array('class' => array('wbk'));
$form['actions']['submit']['#attributes'] = array('class' => array('anniu2'));
}
}
现在,样式正常了。

还有问题,登陆按钮,里面的文字重复显示了,因为背景图片里面已经包含了这两个字。我们在form_alter里面增加这么一行代码:
$form['actions']['submit']['#value'] = t('');
这样,就可以完全使用背景图片的样式了。
复选框后面的文本被去掉了,没有关系,我们直接在user-login.tpl.php里面,给加上来。这是修改后的对应代码:
<td><?php print $remember_me;?><span class="zidong">两周内自动登录</span></td>
现在,使用匿名用户访问登录页面,样式已经完全满足我们的需要了。

Drupal版本:
2.7 去掉页面的标题/标签
作者:老葛,北京亚艾元软件有限责任公司,http://www.yaiyuan.com
如何想去掉这个页面的标题/标签,也就是这部分:

我们可以这样,在sites\all\themes\snt\templates\override下面,创建一个文件夹page,然后将sites\all\themes\snt\templates下面的page.tpl.php复制过来,重命名为page--user--login.tpl.php。
打开page--user--login.tpl.php,找到这段代码:
<?php print render($title_prefix); ?>
<?php if ($title): ?><h1 class="title" id="page-title"><?php print $title; ?></h1><?php endif; ?>
<?php print render($title_suffix); ?>
<?php if ($tabs): ?><div class="tabs"><?php print render($tabs); ?></div><?php endif; ?>
将其删除掉。清楚缓存,现在的登录页面,已经和美工所给的HTML完全保持一致了。
对于表单的覆写,我们最多只能控制它的90%的输出,还是有一部分我们控制不了的,因为Drupal表单里面,有些东西是必须要要有的,不然的话就不能正常工作。但是,我们最需要覆写的输出,我们控制住了,而我们控制不了的那10%,对样式的影响,通常不大。
Drupal版本:
2.8 表单数组结构分析
作者:老葛,北京亚艾元软件有限责任公司,http://www.yaiyuan.com
可能会有读者问,我是怎么知道的使用$form['name']['#attributes'],使用$form['name']['#theme_wrappers']的。我们可以在form_alter里面加上,我们熟悉这段代码:
print debug($form);
就可以查看表单的结构。
array (
'name' =>
array (
'#type' => 'textfield',
'#title' => '用户名',
'#size' => 60,
'#maxlength' => 60,
'#required' => true,
'#description' => '输入您在 SNT 的用户名。',
'#attributes' =>
array (
'tabindex' => 1,
),
),
'pass' =>
array (
'#type' => 'password',
'#title' => '密码',
'#description' => '输入与您用户名相匹配的密码。',
'#required' => true,
'#attributes' =>
array (
'tabindex' => 1,
),
),
'#validate' =>
array (
0 => 'user_login_name_validate',
1 => 'user_login_authenticate_validate',
2 => 'user_login_final_validate',
),
'remember_me' =>
array (
'#title' => '两周内自动登录',
'#type' => 'checkbox',
'#default_value' => 1,
'#attributes' =>
array (
'tabindex' => 1,
),
),
'actions' =>
array (
'#type' => 'actions',
'submit' =>
array (
'#type' => 'submit',
'#value' => '登录',
'#attributes' =>
array (
'tabindex' => 1,
),
),
),
'#form_id' => 'user_login',
'#type' => 'form',
'#build_id' => 'form-q3SaShBE9RJOLYFhQD5E9Dqm3dccXRyxB_EpYlZgyVQ',
'form_build_id' =>
array (
'#type' => 'hidden',
'#value' => 'form-q3SaShBE9RJOLYFhQD5E9Dqm3dccXRyxB_EpYlZgyVQ',
'#id' => 'form-q3SaShBE9RJOLYFhQD5E9Dqm3dccXRyxB_EpYlZgyVQ',
'#name' => 'form_build_id',
'#parents' =>
array (
0 => 'form_build_id',
),
),
'form_id' =>
array (
'#type' => 'hidden',
'#value' => 'user_login',
'#id' => 'edit-user-login',
'#parents' =>
array (
0 => 'form_id',
),
),
'#id' => 'user-login',
'#method' => 'post',
'#action' => '/snt2/user/login',
'#theme_wrappers' =>
array (
0 => 'form',
),
'#tree' => false,
'#parents' =>
array (
),
'#submit' =>
array (
0 => 'user_login_submit',
),
'#theme' =>
array (
0 => 'user_login',
),
)
在snt_preprocess_user_login里面,使用print debug($variables['form']);,也是同样的效果。
Drupal版本:
2.9 表单覆写示例2
作者:老葛,北京亚艾元软件有限责任公司,http://www.yaiyuan.com
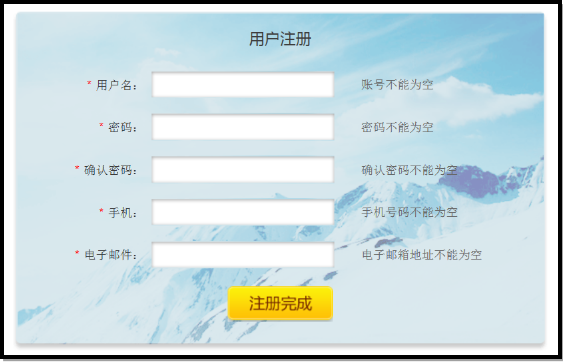
我们最后,看注册页面,这也是一个表单,更复杂一点,我们这里给出代码,和具体的实现。我们的目标样式:
1) 我们需要为用户添加一个手机字段,并将它显示在注册表单页面。导航到admin/config/people/accounts/fields,添加手机字段,字段配置。
|
属性 |
值 |
|
标签 |
手机 |
|
机读名称 |
field_telephone |
|
字段类型 |
文本 |
|
控件 |
文本字段 |
|
必填字段 |
选中 |
|
在用户注册表单中显示 |
选中 |
|
值的数量 |
1 |
其它采用默认配置即可。现在的注册表单,是这个样子的:

为了让用户能够在注册的时候,设置自己的密码,我们需要在admin/config/people/accounts页面,账号设置页面,配置一下,这里是我的配置:

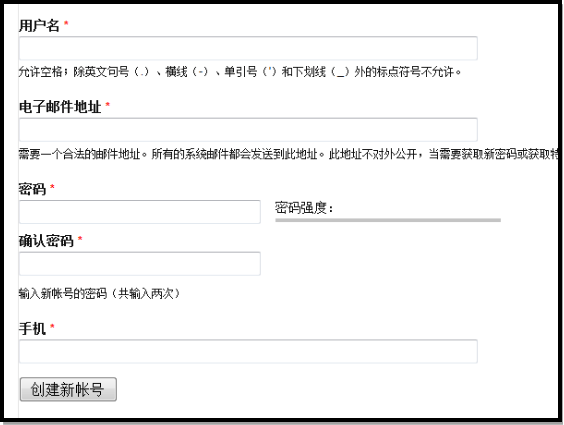
现在注册页面,用户可以设置自己的密码了:
2) 我们开始写代码了,这里给出来的是我调试好的代码。在template.php的snt_theme函数里面,添加以下代码:
$hooks['user_register_form'] = array(
'template' => 'user-register-form',
'render element' => 'form',
'path' => drupal_get_path('theme','snt').'/templates',
//'preprocess functions' => array('snt_preprocess_user_register_form'),
);
添加预处理函数snt_preprocess_user_register_form:
function snt_preprocess_user_register_form(&$variables) {
//print debug($variables['form']);
$variables['form']['account']['pass']['pass1']['#theme_wrappers'] = array();
$variables['form']['account']['pass']['pass2']['#theme_wrappers'] = array();
$variables['form']['account']['pass']['pass1']['#attributes'] = array('class' => array('wbk'));
$variables['form']['account']['pass']['pass2']['#attributes'] = array('class' => array('wbk'));
}
添加函数snt_form_user_register_form_alter:
function snt_form_user_register_form_alter(&$form, &$form_state) {
//drupal_set_message('123456');
//print debug($form['account']['pass']['pass1']);
$form['account']['name']['#theme_wrappers'] = array();
$form['account']['mail']['#theme_wrappers'] = array();
$form['account']['pass']['#theme_wrappers'] = array();
//$form['account']['pass']['pass1']['#theme_wrappers'] = array();
//$form['account']['pass']['pass2']['#theme_wrappers'] = array();
$form['field_telephone']['und'][0]['value']['#theme_wrappers'] = array();
$form['account']['name']['#attributes'] = array('class' => array('wbk'));
$form['account']['mail']['#attributes'] = array('class' => array('wbk'));
//$form['account']['pass']['pass1']['#attributes'] = array('class' => array('wbk'));
$form['field_telephone']['und'][0]['value']['#attributes'] = array('class' => array('wbk'));
$form['actions']['submit']['#attributes'] = array('class' => array('anniu'));
$form['actions']['submit']['#value'] = t('');
// print debug($form['account']['pass']);
}
最后创建user-register-form.tpl.php文件,里面的代码如下:
<div class="zhuce">
<table width="489" border="0" align="center">
<tr>
<td class="yhzc" colspan="3">用户注册</td>
</tr>
<tr>
<td class="mima"><span>*</span>用户名:</td>
<td><label><?php print render($form['account']['name']); ?></label></td>
<td class="hb">账号不能为空</td>
</tr>
<tr>
<td class="mima"><span>*</span>密码:</td>
<td><label><?php print render($form['account']['pass']['pass1']); ?></label></td>
<td class="hb">密码不能为空</td>
</tr>
<tr>
<td class="mima"><span>*</span>确认密码:</td>
<td><label><?php print render($form['account']['pass']['pass2']); ?></label></td>
<td class="hb">确认密码不能为空</td>
</tr>
<tr>
<td class="mima"><span>*</span>手机:</td>
<td><label><?php print render($form['field_telephone']['und'][0]['value']); ?></label></td>
<td class="hb">手机号码不能为空</td>
</tr>
<tr>
<td class="mima"><span>*</span>电子邮件:</td>
<td><label><?php print render($form['account']['mail']); ?></label></td>
<td class="hb">电子邮箱地址不能为空</td>
</tr>
<tr>
<td class="xib" colspan="3"><label><?php print drupal_render($form['actions']); ?></label></td>
</tr>
</table>
<?php drupal_render_children($form)?>
</div>
这里面的代码,实现方式,与前面我们介绍的有所不同,我们没有在预处理函数里面定义变量,而是直接在模板里面输出对应的表单元素,注意这句代码的应用:
<?php print render($form['account']['name']); ?>
还有,就是密码确认表单元素,实际上由两部分组成pass1和pass2,不过在form_alter里面,我们获取不到,所以把对它们的修改放在了预处理函数里面了。
再有就是字段field_telephone的用法,需要特别的注意,对应的数组结构。
最终样式,完全和目标一致:
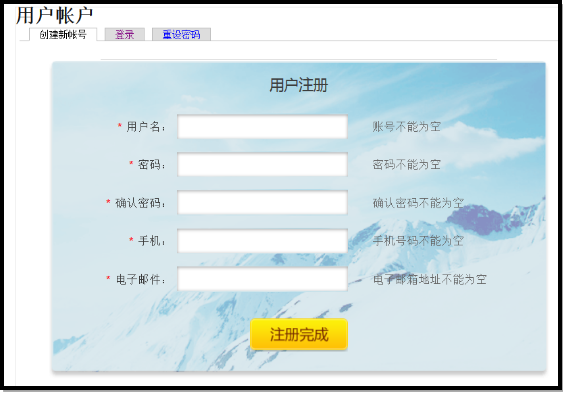
如何去掉这里的标题和标签呢?前面已经有个例子了,这里就不多说了。